CS110 Computer Architecture - Project 1: Make a Toy Venus - A RISC-V Assembler
Project 1: Make a Toy Venus
Project 1.1: A RISC-V Assembler
IMPORTANT INFO - PLEASE READ
The projects are part of your design project worth 2 credit points. As such they run in parallel to the actual course. So be aware that the due date for project and homework might be very close to each other! Start early and do not procrastinate
The projects are part of your design project worth 2 credit points. As such they run in parallel to the actual course. So be aware that the due date for project and homework might be very close to each other! Start early and do not procrastinate
Goal of Project 1
In Project 1, you will make a simple toy Venus, consisting of both assembler and emulator. If you are not yet familiar with Venus, try it out now. At the end of this project, you will understand the C programming language and the underlying execution of RISC-V assembly.
Introduction to Project 1.1
Firstly, let's make an assembler in Project 1.1. Our assembler is a simple two-pass assembler. It will keep .text and .data segment apart. The linking process is not considered.
At a high level, the functionality of our assembler can be divided as follows.
- Pass 1: Reads an input (.s) file. Comments are stripped. Constructs the .data segment in a data file, and the address of each label is recorded into a symbol table. Theses labels are validated here. The .text segment code will be recorded in a code file. This pass will output 3 files: data file, symbol table file, and an original code file.About original & basic code file
To clarify, the code file generated in pass 1 will be called original file. It is because no modification is made at this point to the .text segment. In fact, we borrow the meaning of "original" and "basic" from Venus. So again, try Venus now if you didn't. - Pass 2: Reads the symbol table file and original file. Then translates each instruction to basic code and machine code. Pseudo-instructions is translated here. Instruction syntax and arguments are validated at this step. This pass will output 2 files: basic code file and machine code file.
Background of The Instruction Set
Registers
Please consult the RISC-V Green Sheet (PDF) for register numbers, instruction opcodes, and bitwise formats. Our asembler will support all 32 registers: x0, ra, sp, gp, tp, t0-t6, s0 - s11, a0 - a7. The name x0 can be used in lieu of zero. Other register numbers (eg. x1, x2, etc.) shall be also supported. Note that floating point registers are not included in project 1.
Instructions
We will have 42 instructions 8 pseudo-instructions to assemble. The instructions are:
| INSTRUCTION | TYPE | OPCODE | FUNCT3 | FUNCT7/IMM | OPERATION |
| add rd, rs1, rs2 | R | 0x33 | 0x0 | 0x00 | R[rd] ← R[rs1] + R[rs2] |
| mul rd, rs1, rs2 | 0x0 | 0x01 | R[rd] ← (R[rs1] * R[rs2])[31:0] | ||
| sub rd, rs1, rs2 | 0x0 | 0x20 | R[rd] ← R[rs1] - R[rs2] | ||
| sll rd, rs1, rs2 | 0x1 | 0x00 | R[rd] ← R[rs1] << R[rs2] | ||
| mulh rd, rs1, rs2 | 0x1 | 0x01 | R[rd] ← (R[rs1] * R[rs2])[63:32] | ||
| slt rd, rs1, rs2 | 0x2 | 0x00 | R[rd] ← (R[rs1] < R[rs2]) ? 1 : 0 | ||
| sltu rd, rs1, rs2 | 0x3 | 0x00 | R[rd] ← (U(R[rs1]) < U(R[rs2])) ? 1 : 0 | ||
| xor rd, rs1, rs2 | 0x4 | 0x00 | R[rd] ← R[rs1] ^ R[rs2] | ||
| div rd, rs1, rs2 | 0x4 | 0x01 | R[rd] ← R[rs1] / R[rs2] | ||
| srl rd, rs1, rs2 | 0x5 | 0x00 | R[rd] ← R[rs1] >> R[rs2] | ||
| sra rd, rs1, rs2 | 0x5 | 0x20 | R[rd] ← R[rs1] >> R[rs2] | ||
| or rd, rs1, rs2 | 0x6 | 0x00 | R[rd] ← R[rs1] | R[rs2] | ||
| rem rd, rs1, rs2 | 0x6 | 0x01 | R[rd] ← (R[rs1] % R[rs2] | ||
| and rd, rs1, rs2 | 0x7 | 0x00 | R[rd] ← R[rs1] & R[rs2] | ||
| lb rd, offset(rs1) | I | 0x03 | 0x0 | R[rd] ← SignExt(Mem(R[rs1] + offset, byte)) | |
| lh rd, offset(rs1) | 0x1 | R[rd] ← SignExt(Mem(R[rs1] + offset, half)) | |||
| lw rd, offset(rs1) | 0x2 | R[rd] ← Mem(R[rs1] + offset, word) | |||
| lbu rd, offset(rs1) | 0x4 | R[rd] ← U(Mem(R[rs1] + offset, byte)) | |||
| lhu rd, offset(rs1) | 0x5 | R[rd] ← U(Mem(R[rs1] + offset, half)) | |||
| addi rd, rs1, imm | 0x13 | 0x0 | R[rd] ← R[rs1] + imm | ||
| slli rd, rs1, imm | 0x1 | 0x00 | R[rd] ← R[rs1] << imm | ||
| slti rd, rs1, imm | 0x2 | R[rd] ← (R[rs1] < imm) ? 1 : 0 | |||
| sltiu rd, rs1, imm | 0x3 | R[rd] ← (U(R[rs1]) < U(imm)) ? 1 : 0 | |||
| xori rd, rs1, imm | 0x4 | R[rd] ← R[rs1] ^ imm | |||
| srli rd, rs1, imm | 0x5 | 0x00 | R[rd] ← R[rs1] >> imm | ||
| srai rd, rs1, imm | 0x5 | 0x20 | R[rd] ← R[rs1] >> imm | ||
| ori rd, rs1, imm | 0x6 | R[rd] ← R[rs1] | imm | |||
| andi rd, rs1, imm | 0x7 | R[rd] ← R[rs1] & imm | |||
| jalr rd, rs1, imm | 0x67 | 0x0 | R[rd] ← PC + 4 PC ← R[rs1] + imm | ||
| ecall | 0x73 | 0x0 | 0x000 | (Transfers control to operating system) a0 = 1 is print value of a1 as an integer. a0 = 4 is print the string at address a1. a0 = 10 is exit or end of code indicator. a0 = 11 is print value of a1 as a character. | |
| sb rs2, offset(rs1) | S | 0x23 | 0x0 | Mem(R[rs1] + offset) ← R[rs2][7:0] | |
| sh rs2, offset(rs1) | 0x1 | Mem(R[rs1] + offset) ← R[rs2][15:0] | |||
| sw rs2, offset(rs1) | 0x2 | Mem(R[rs1] + offset) ← R[rs2] | |||
| beq rs1, rs2, offset | SB | 0x63 | 0x0 | if(R[rs1] == R[rs2]) PC ← PC + {offset, 1b'0} | |
| bne rs1, rs2, offset | 0x1 | if(R[rs1] != R[rs2]) PC ← PC + {offset, 1b'0} | |||
| blt rs1, rs2, offset | 0x4 | if(R[rs1] < R[rs2]) PC ← PC + {offset, 1b'0} | |||
| bge rs1, rs2, offset | 0x5 | if(R[rs1] >= R[rs2]) PC ← PC + {offset, 1b'0} | |||
| bltu rs1, rs2, offset | 0x6 | if(U(R[rs1]) < U(R[rs2])) PC ← PC + {offset, 1b'0} | |||
| bgeu rs1, rs2, offset | 0x7 | if(U(R[rs1]) >= U(R[rs2])) PC ← PC + {offset, 1b'0} | |||
| auipc rd, offset | U | 0x17 | R[rd] ← PC + {offset, 12b'0} | ||
| lui rd, offset | 0x37 | R[rd] ← {offset, 12b'0} | |||
| jal rd, imm | UJ | 0x6f | R[rd] ← PC + 4 PC ← PC + {imm, 1b'0} |
The pseudo-instructions are:
| PSEUDO-INSTRUCTION | FORMAT | USES |
| Branch on Equal to Zero | beqz rs1, label | beq |
| Branch on not Equal to Zero | bnez rs1, label | bne |
| Jump | j label | jal |
| Jump Register | jr rs1 | jalr |
| Load Address | la rd, label | auipc, addi |
| Load Immediate | li rd, immediate | lui, addi |
| Load Word at address of Label | lw rd, label | auipc, lw |
| Move | mv rd, rs1 | lui, addi |
For further reference, here are the bit lengths of the instruction components.
| R-TYPE | funct7 | rs2 | rs1 | funct3 | rd | opcode |
| Bits | 7 | 5 | 5 | 3 | 5 | 7 |
| I-TYPE | imm[11:0] | rs1 | funct3 | rd | opcode |
| Bits | 12 | 5 | 3 | 5 | 7 |
| S-TYPE | imm[11:5] | rs2 | rs1 | funct3 | imm[4:0] | opcode |
| Bits | 7 | 5 | 5 | 3 | 5 | 7 |
| SB-TYPE | imm[12] | imm[10:5] | rs2 | rs1 | funct3 | imm[4:1] | imm[11] | opcode |
| Bits | 1 | 6 | 5 | 5 | 3 | 4 | 1 | 7 |
| U-TYPE | imm[31:12] | rd | opcode |
| Bits | 20 | 5 | 7 |
| UJ-TYPE | imm[20] | imm[10:1] | imm[11] | imm[19:12] | rd | opcode |
| Bits | 1 | 10 | 1 | 8 | 5 | 7 |
Getting Started
Step 0: Obtaining the Files
- Clone your p1 repository from gitlab. You may want to change http to https.
- In the repository add a remote repo that contains the framework files:
git remote add framework https://autolab.sist.shanghaitech.edu.cn/gitlab/cs110_23s/p1.1_framework.git (or change to http) - Go and fetch the files:
git fetch framework - Now merge those files with your master branch:
git merge framework/master - The rest of the git commands work as usual.
Step 1: Building Blocks
Finish the implementation of translate_reg() and translate_num() in src/translation_utils.c.
You need to fill in the blank in translate_reg() since it is incomplete for some register translations. You can find register numbers on the RISC-V Green Sheet (PDF). Unfortunately, there are no built-in switch statements for strings in C, so an if-else ladder is the way to compare multiple strings.
For translate_num(), you should use the library function strtol() (documented here). translate_num() should translate a numerical string (either decimal or hexadecimal) into a signed number, and then check to make sure that the result is within the bounds specified. If the string is invalid or outside of the bounds, return -1.
Step 2: Symbol Table
Implement a data structure and interface to store symbol name-to-address mappings in src/tables.c.
Multiple SymbolTable's may be created at the same time, and each must resize to fit an arbitrary number of entries (so you should use dynamic memory allocation). You may design the data structure in any way you like, as long as you do not change the function definitions. A SymbolTable struct has been defined in src/tables.h, and you may use the existing implementation or create your own if that feels more intuitive. Feel free to declare additional helper methods. See src/tables.c for details.
In add_to_table(), you cannot simply store the character pointer that was given, as it could point to a temporary array. You must store a copy of that string instead. You should use the helper functions defined in src/tables.c whenever appropriate.
You must make sure to free all memory that you allocate. See Valgrind for more information.
Step 3: Write Instruction
Implement write_instruction() in src/translate.c. The RISC-V Green Sheet (PDF) will again be helpful, and so will bitwise operations.
write_instruction() should write instructions to basic code and hexadecimal format. Note that the function is incomplete. You must first fix the funct fields before implement the rest of the function. You will find the translate_reg(), translate_num(), write_inst_hex(), write_inst_rtype(), write_inst_stype() write_inst_sbtype() write_inst_utype() and write_inst_ecall() functions helpful in this step (all defined in translate_utils.h).
Some instructions may also require the symbol, which is given by the symtbl pointer.
This step may require writing a lot of code, but the code should be similar in nature, and therefore not difficult. The more important issue is input validation -- you must make sure that all incoming arguments are valid. If an input is invalid, you should NOT write anything to output and return -1 directly.
Use your knowledge about RISC-V instruction formats and think carefully about how inputs could be invalid. You are encouraged to use Venus as a resource. Do note that Venus has more pseudo-instruction expansions than our assembler, which means that instructions with invalid arguments for our assembler could be treated as a pseduoinstruction by Venus. Therefore, you should check .text segment by yourselves after assembling to make sure that the instruction has not been expanded by Venus.
If a branch offset cannot fit inside the immediate field, you should treat it as an error.
Step 4: Pseudo-instruction Expansion
Implement translate_inst() in src/translate.c, which should perform pseudo-instruction expansion.
The load immediate instruction normally gets expanded into an lui-addi pair. However, an optimization can be made when the immediate is small. If the immediate can fit inside the imm field of an addi instruction, we will use an addi instruction instead. You are not required to perform other optimizations.
Also, make sure your pseudo-instruction expansions do not produce any unintended side effects and are the same with Venus in normal case. You are required to check errors on the pseudo-instructions (see src/translate.c for details). If there is an error, do NOT write anything to the intermediate file, and return 0 to indicate that 0 lines have been written.
Although jump and link and jump and link register are not pseudo-instructions themselves, the short-hand format of these two instructions are pseudo-instructions, i.e.
jal label and jalr rs1. You should also expand them to the form of jal rd label and jalr rd rs1 imm.For
la rd label and lw rd label, observe the corresponding basic code in Venus, think about how it is calculated.Putting It All Together
Implement pass_one() and pass_two() in assembler.c.
In the first pass, the assembler will strip comments, add labels to the symbol table, construct data segments, and write assembly code into an orginal file. In the second pass, the assembler will read the original file and symbol table, translate the instructions into machine code using the symbol table, and write it to basic file and machine file.
Afterwards, the symbol table will be written to the output file as well, and we have finished this part for you :).
Before you get down to pass_two(), read the documentation of fgets() and strtok() and understand how they work.
It will be easier to implement pass_two() first. The comments in the function will give you a more detailed outline of what to do, as well as what assumptions you shall make. Your program should not exit if a line contains an error. Instead, keep track of whether any errors have occured, and if so, return -1 at the end. pass_one() should be structured similarly to pass_two(), except that you will also need to parse out comments and labels and distinguishing segments. You will find the skip_comment() and add_if_label() functions useful.
As an aside, our parser is much more lenient than an actual RISC-V parser. Building a good parser is outside the scope of this course, but we encourage you to learn about finite state automata if you are interested.
Line Numbers and Byte Offsets
In parsing, you will need to keep track of two kinds of numbers, the line number and the byte offset of the current instruction or data.
Line numbers start at 1, and include whitespace. The byte offset refers to how far away the current instruction or data is from the start address (TEXT_BASE or DATA_BASE in types.h), and does NOT include whitespace. You can consider the byte offset as where each instruction will be if the instructions were loaded into memory starting at address 0. See the example below.
The address of a label is the sum of the byte offset and the start address of segment (TEXT_BASE + DATA_BASE). e.g. In the example below, L1 has an address of 4+DATA_BASE, L2 has an address of 14+DATA_BASE, L3 has an address of 4+TEXT_BASE, L4 has an address of 8+TEXT_BASE
| LINE # | BYTE OFFSET | INPUT FILE |
| 1 | 0 | .data |
| 2 | 0 | .word 0x0e37a2c8 |
| 3 | 4 | L1: |
| 4 | 4 | .byte 0xf2 |
| 5 | 5 | .half 0xa8ce |
| 6 | 7 | .word 0x14e7bda0 |
| 7 | 11 | .byte 0x2c 0xcd 0x72 |
| 8 | 14 | L2: .half 0xc37 |
| 9 | 0 | .text |
| 10 | 0 | addi t0 a0 0 |
| 11 | 4 | L3: lw t1 0(t0) |
| 12 | 8 | # This is a comment |
| 13 | 8 | L4: |
| 14 | 8 | ori t1 t1 0xABCD |
| 15 | 12 | addi t1 t1 3 |
| 16 | 16 | |
| 17 | 16 | bne t1 a2 L2 |
Error Handling
If an input file contains an error, your assembler is only required to print the correct error messages. The contents of your .int and .out files are not considered.
There are two kinds of errors you may encounter: Errors with instructions and errors with labels. Error checking of labels is done for you by add_if_label(). However, you are still required to record that an error has occurred so that pass_one() can return -1.
In pass_one(), errors with instructions can be raised by 1) write_original_code() or 2) the instruction having too many arguments. In pass_two(), errors with instructions will only be raised by translate_inst(). Both write_original_code() and translate_inst() should return a special value (0 and -1 respectively) in the event of an error. You will need to detect whether an instuction has too many arguments yourself in pass_one().
Whenever an error is encountered in either pass_one() or pass_two(), record that there is an error and move on. Do not exit the function prematurely. When the function exits, return -1.
For information about testing error message, see Error Message Testing.
Testing
You are responsible for testing your code. While we have provided a few test cases, they are by no means comprehensive. Fortunately, you have a variety of testing tools at your service.
Valgrind
You should use Valgrind to check whether your code has any memory leaks. We have included a file, run-valgrind, which will run Valgrind on any executable of your choice. If you get a permission denied error, try adding the execute permission to the file:
chmod u+x run-valgrind
Then you can run Valgrind by typing:
./run-valgrind <whatever program you want to run>
For example, if you wanted to see whether running the following command would cause any memory leaks,
./riscv assembler-p1 in/labels.s -d out/labels.data -s out/labels.symbol -o labels.original
You should run ./riscv assembler-p1 in/labels.s -d out/labels.data -s out/labels.symbol -o labels.original.
Venus
Since you're writing an assembler, why not refer to an existing assembler? Venus is a powerful reference for you to use, and you are encouraged to write your own RISC-V files and assemble them using Venus.
In some cases, the output of Venus will differ from the specifications of this project. You should always follow the specs, except for Load Word at address of Label. This is because Venus 1) supports more pseudo-instructions, 2) has slightly different pseudo-instruction expansion rules, and 3) acts as an assembler and linker. You should always examine the assembled instructions carefully when testing with Venus.
Diff
diff is a utility for comparing the contents of files. Running the following command will print out the differences between file1 and file2:
diff <file1> <file2>
To see how to interpret diff results, click here. We have provided some sample input-output pairs (again, these are not comprehensive tests) located in the input and out/ref directories respectively. For example, to check the output of running test/part1/pass1/in/labels.s on your assembler against the expected output, run:
./riscv assembler $PASS1_IN/labels.s -d $PASS1_OUT/labels.data -s $PASS1_OUT/labels.symbol -o $PASS1_OUT/labels.original -b $PASS2_OUT/labels.basic -t $PASS2_OUT/labels.text
diff $PASS1_OUT/labels.data $PASS1_REF/labels.data
diff $PASS1_OUT/labels.symbol $PASS1_REF/labels.symbol
diff $PASS1_OUT/labels.original $PASS1_REF/labels.original
diff $PASS2_OUT/labels.basic $PASS2_REF/labels.basic
diff $PASS2_OUT/labels.text $PASS2_REF/labels.text
if we assume the following variables.
  PASS1_IN=test/part1/pass1/in
  PASS1_OUT=test/part1/pass1/out
  PASS1_REF=test/part1/pass1/ref
  PASS2_OUT=test/part1/pass2/out
  PASS2_REF=test/part1/pass2/ref
Running the Assembler
First, make sure your assembler executable is up to date by running make.
By default, the program gives help message if you do not specify any arguments. The first pass reads an input file and translates it into an intermediate file. The second pass reads the intermediate file and translates it into an output file. As illustrated below.
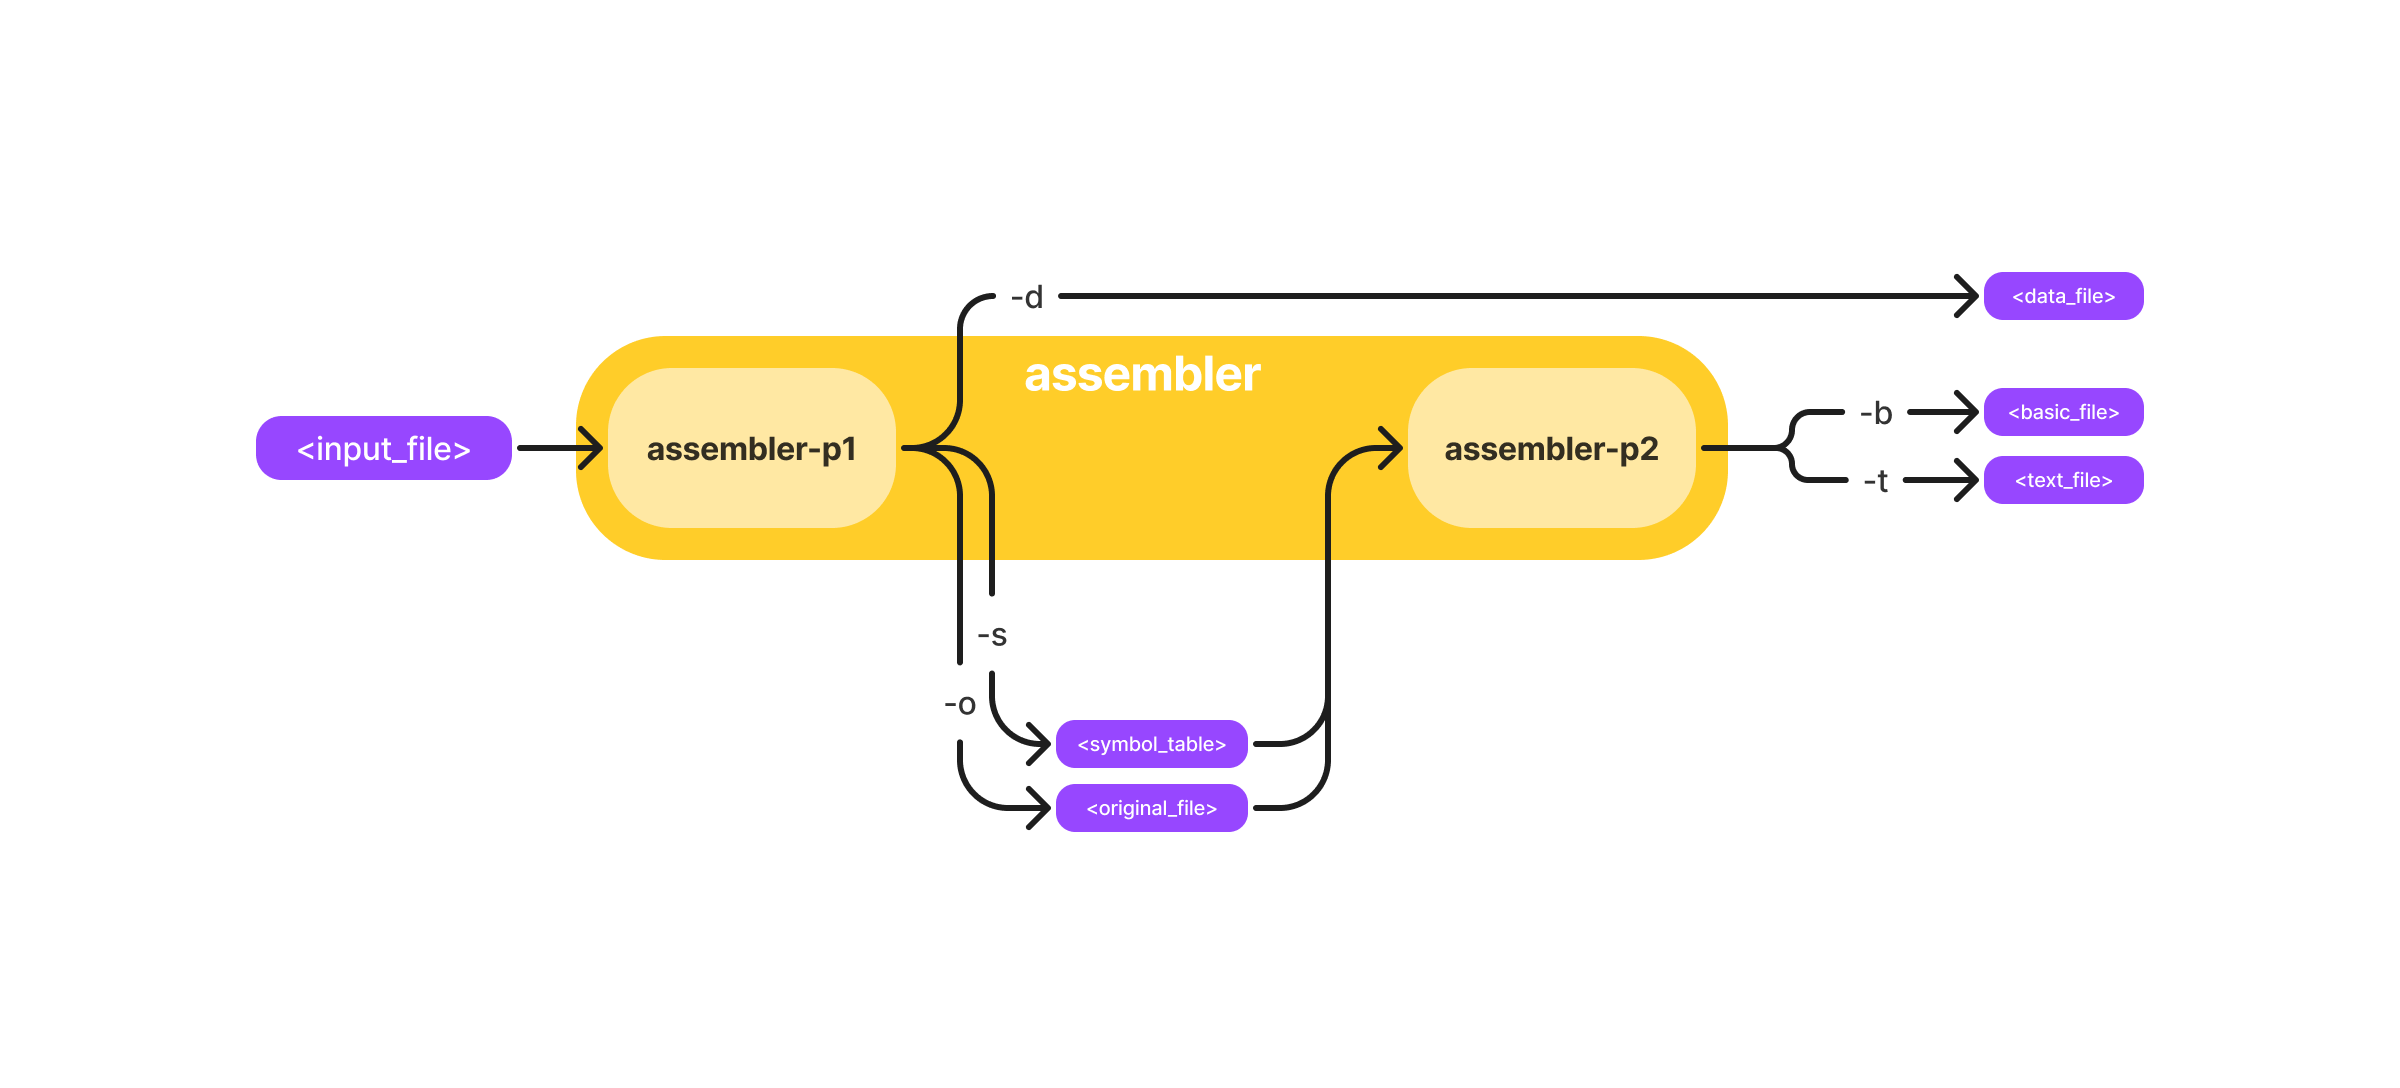
Run all
To run both passes, type:
./riscv assembler <input_file> -d <data_file> -s <symbol_table_file> -o <original_file> -b <basic_file> -t <basic_file>
You can also simply omit -s <symbol_table_file> and -o <original_file> during your test, since they are just intermediate files for pass 2:
./riscv assembler <input_file> -d <data_file> -b <basic_file> -t <basic_file>
Run pass 1
Alternatively, you can run only a single pass, which may be helpful while debugging. To run only the first pass, use the assembler-p1 option:
./riscv assembler-p1 <input_file> -d <data_file> -s <symbol_table_file> -o <original_file>
Run pass 2
To run only the second pass, use the assembler-p2 option. Note that when running pass two only, your symbol table will be empty since labels were stripped in pass_one(), so it may affect your branch instructions.
./riscv assembler-p2 <symbol_table_file> <original_file> -b <basic_file> -t <text_file>
Error Message Testing
When testing cases that should produce error messages, you may want to use the -log flag to log error messages to a text file. The -log flag should be followed with the location of the output file (WARNING: old contents will be overwritten!), and it can be used with any of the three modes above.
We have provided two tests for error messages, one for errors that should be raised during pass_one(), and one for errors that should be raised during pass_two(). To test for pass_one() errors, assemble input/p1_errors.s with the -p1 flag and verify that your output matches the expected output:
./assembler -p1 input/p1_errors.s out/p1_errors.int -log log/p1_errors.txt
diff log/p1_errors.txt log/ref/p1_errors_ref.txt
To test for pass_two() errors, assemble input/p2_errors.s running both passes:
./assembler input/p2_errors.s out/p2_errors.int out/p2_errors.out -log log/p2_errors.txt
diff log/p2_errors.txt log/ref/p2_errors_ref.txt
Your intermediate and output files (.int and .out files) do NOT need to match the reference output if the input file contains an error.
Notices on Grading
- The Autolab will enforce a proper amount of comments again!
- Make sure you add proper comments - about two every eight lines of code that you ADD. We will check this by hand.
- The Autolab will use -Wpedantic -Wall -Wextra -Werror -std=c89. You may NOT edit the Makefile!
How many lines of code I need to write?
Here is a summary of the solution code. The final row gives total lines inserted and deleted; a changed line counts as both an insertion and a deletion. However, there are many possible solutions and many of them may differ.
      part1/assembler.c        	| 167 +++++++++++++++++++++++++++++++++++++++++++++++++++++++
      part1/tables.c            |  83 ++++++++++++++++++++++++++++
      part1/tables.h            |   2 +
      part1/translate.c         | 319 +++++++++++++++++++++++++++++++++++++++++++++++++++++++++++++++++++++++++++++++++++++++++++++++++++++++++
      part1/translate_utils.c   |  82 ++++++++++++++++++++++++++-
5 files changed, 651 insertions(+), 2 deletions(-) 

