CMSC 341 Data Structures - Project 2: The Drone Show Software
Project 2: The Drone Show Software - Spring 2023
Objectives
- Implementing balanced binary search tree (BST) data structures.
- Practice writing rebalancing routines.
- Practice using recursion in programs.
- Practice writing unit tests.
- Practice measuring the performance of an algorithm.
Introduction
With the advances in drone technologies many companies today provide the large-scale show presentations of drones in the air. Some even argue that these types of shows can replace the fireworks. In such a show thousands of drones are flying synchronously and create different formations while flying. The following figure presents a sample formation.

In some configurations the drones are completely synchronized by the command center. And a team of pilots run the command center. In other configurations drones can perform some limited synchronization through peer-to-peer communication. In the other word, the drones send messages to each other. The communicated messages along with the current advances in the AI (Artificial Intelligence) field help the operations while reducing the communication between drones and the command center.
A startup company defined a project to develop a software module that runs in a drone and sends/receives the messages from other drones. You are assigned the task of designing and developing an efficient data structure that stores the information of all drones in a show. The software management team decided that a balanced Binary search tree would be the best option. The data structure that you develop will be loaded to all drones before the start of the show and at all times it will be updated through the communications between drones.
The Binary Search Tree (BST)
A binary tree is a tree structure in which each node has either 0, 1, or 2 children. A BST is a derivative of a binary tree where each node contains a key and value pair. The key determines the nodes' placement in the tree, and the value is the data to be stored. Given a set of rules about how to order the keys, we can create a structure where we can query data from it with a specified key. For a BST, we define these rules as follows:
- If the target key is less than the key at the current node, traverse to the left child.
- If the target key is greater than the key at the current node, traverse to the right child.
- If the keys are equal, the action is determined by our application of the tree. More on this later.
A BST on its own can be efficient, but as the dataset increases in size, we can start running into problems. In the worst case, our BST can become a linked list where each of the new keys is greater than or less than the previous one inserted. On the contrary, the best case is inserting elements into the tree in a way to make it a complete tree. Either case is rare to occur with a large dataset, but imbalances are common. An imbalance can be defined when one subtree on a node becomes significnelty larger in size or height compared to the other subtree. As the tree becomes increasingly imbalanced, our average query times begin to increase. Luckily, we have methods to prevent large imbalances.
The AVL Tree
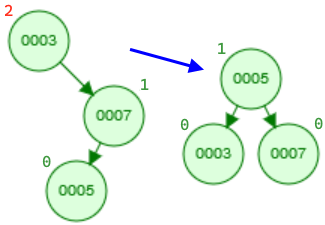
An AVL tree employs rotations during insertions or deletions to balance a BST. As the name implies, nodes are literally rotated up the tree to keep its structure complete. A complete tree, or ideally a perfect tree, is the most efficient kind of binary tree. Insertions, deletions, and queries all take O(log(n)) time in such a case. AVL trees have two types of rotations, left and right, which are shown in the diagram below:
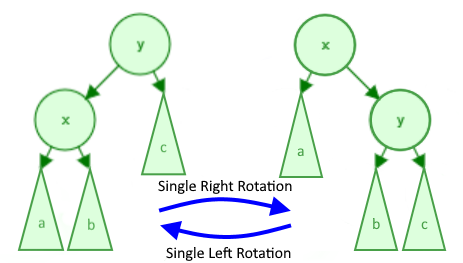
The variables "x" and "y" refer to 2 specific nodes whereas the subtrees "a", "b", and "c" refer to subtrees (which is just a pointer to a node which may or may not have more children). Note that the pointers to "a", "b", and/or "c" can be null, but "x" nor "y" will never be null.
The key to keeping an AVL tree efficient is when we perform these rotations. A rotation is performed on a node that is imbalanced, and an imbalance occurs when the node's children's heights differ by more than 1. For example, in the above diagram, consider node "y" to be imbalanced in the right rotation and node "x" to be imbalanced in the left rotation. Using a left and right rotation, we can perform four rotation combinations. The imbalance in the following examples occurs on the node with the height of 2 (in red).
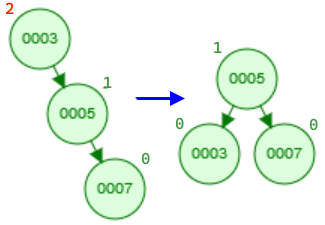
- Single left rotation: This is a simple case where we can apply a left rotation to the top node to balance the tree.
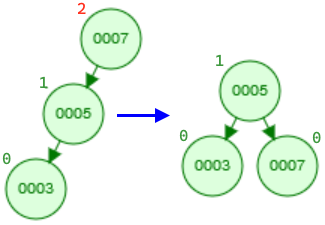
- Single right rotation: Similar to the above case, we can apply a single right rotation to the top node to balance the tree.
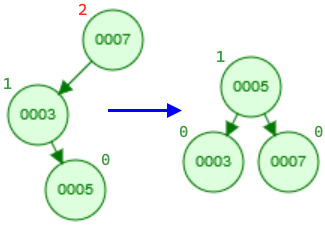
- Double left-right rotation: The following two cases become more complicated and require two rotations. In this example, the imbalance still occurs at the node with height 2. If we perform a single right rotation, we still end up with an unbalanced tree, just mirrored (draw a diagram). So, we must perform two rotations. The first left rotation should transform the tree into a form we can balance with a second right rotation. Which node should the first rotation be performed on (hint: it's not necessarily the node with height 2)?
- Double right-left rotation: Likewise, this case uses a right rotation followed by a left rotation.
Assignment
Your assignment is to implement a binary search tree with balancing methods.
For this project, you are provided with the skeleton .h and .cpp files and a sample driver:
- show.h – Interface for the Drone and Show classes.
- show.cpp – A skeleton for the implementation of the class Show.
- driver.cpp – a sample driver program. (Note: this file is provided to show a typical usage. Since the project is not implemented, trying to compile and run this driver program will not generate the sample output in driver.txt. Once you develop your project, you should be able to generate the same output as driver.txt by running this driver program.)
- driver.txt – a sample output produced by driver.cpp
Please note, you may not change any of the private variables or public function declarations or file names. They will be used for grading. Also, any provided function implementations may not be modified. You may, however, add your own private variables and functions as helpers. The current private function declarations are provided as a backbone to help you.
Additionally, you are responsible for thoroughly testing your program. Your test program, mytest.cpp, must be submitted along with other files. For grading purposes, your implementation will be tested on input data of varying sizes, including very large data. Your submission will also be checked for memory leaks and memory errors.
Specifications
This project has three classes: Random, Drone, and Show. The Random class is provided as a supplementary class to facilitate the testing. The Drone class defines the nodes in the binary tree. The Show class is the one that implements the balanced binary search tree.
Class Show
The Show class implements an AVL BST. The Show::m_root member variable points to a node of type Drone. Every node in Show is a Drone object. The nodes are organized as a binary search tree. The Show class supports the insertion and deletion operations. After insertion or deletion operations the class checks for any imbalance and if required it performs the rebalancing operations.
For the Show class, you must implement the following methods in show.cpp:
Note:
- In the Show tree data structure every node is a Drone object which is represented as a pointer to the Drone object. Therefore, for every insertion we need to allocate memory and use the information of aDrone to initialize the new node. Memory allocation takes place in the Show class.
- After an insertion, we should also update the height of each node on the path traversed down the tree as well as check for an imbalance at each node in this path.
Additional Requirements
- The class declarations Show, Drone, Random and provided function implementations in show.cpp may not be modified in any way. No additional libraries may be used. However, private helper functions are permitted in the Show class.
- No STL containers or additional libraries may be used in the implementation of the Show class. However, you can use STL containers in the Tester class for the testing purposes.
- The required functionality is provided in the Drone class. There is no need for any modifications to the implementation of this class.
- Your code should not have any memory leaks or memory errors.
- The lowest level of nodes which store the keys have zero height.
- Follow all coding standards as described on the C++ Coding Standards. In particular, indentations and meaningful comments are important.
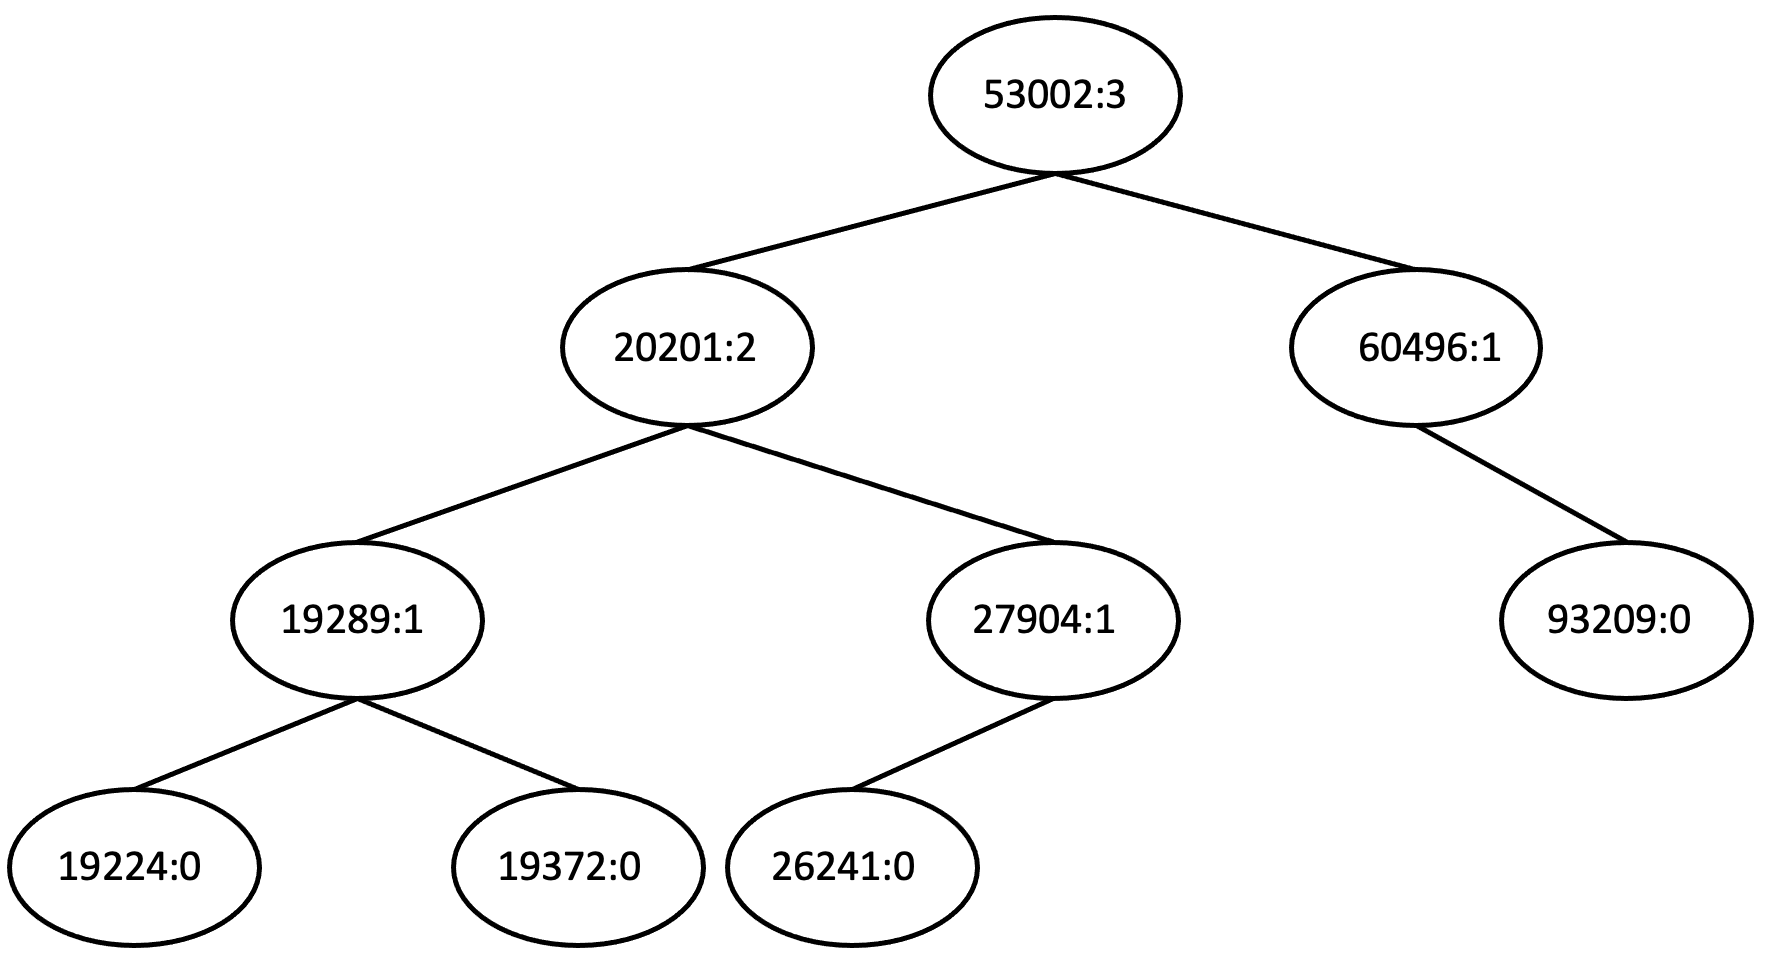
- The function Show::dumpTree(...) prints out the nodes information in an in-order traversal. For every node, it prints the id followed by the height of the node in the Show tree. The following example presents a sample output of the dumpTree() function. The tree viewer tool shows a graphical representation of the output of the dump function. You can copy & paste the dump() output in the viewer. This tool facilitates debugging. Note: The implementation for this requirement is provided to you.
((((19224:0)19289:1(19372:0))20201:2((26241:0)27904:1))53002:3(60496:1(93209:0)))
Testing
You need to test your project and you need to submit your tests along with your project. Tests must be submitted in a file called mytest.cpp.
- The test file name must be mytest.cpp; the file name must be in lower case, a file name like myTest.cpp is not acceptable.
- The test file must contain the declaration and implementation of your Tester class and the main() function as well as all your test cases, i.e. calls to your test functions.
- You are responsible for thoroughly testing your work before submission. The following section presents a non-exhaustive list of tests to perform on your implementation.
- You must write a separate function for every test case.
- Every test function must return true/false depending on passing or failing the test. Visual outputs are not accepted as test results.
- Tests cannot be interactive. The test file mytest.cpp must compile and run to completion.
- An example of declaring, implementing, and calling a test function, and outputting the test results was provided in the driver.cpp file of project 0.
- The testing guidelines page provides information that helps you to write more effective test cases.
Note: Testing incrementally makes finding bugs easier. Once you finish a function and it is testable, make sure it is working correctly.
Testing Show Class
- Test the insertion function for a normal case.
- Test the insertion function for an edge case.
- Test the insertion function for an error case.
- Test whether the tree is balanced after a decent number of insertions, e.g. 300 insertions. (Note: this requires visiting all nodes and checking the height values)
- Test whether the BST property is preserved after all insertions. (Note: this requires visiting all nodes and comparing key values)
- Test the remove function for a normal case.
- Test the remove function for an edge case.
- Test whether the tree is balanced after multiple removals. For example, insert 300 nodes, then remove 150, and check the property.
- Test whether the BST property is preserved after multiple removals.
- Test the removeLightOff() functionality.
- Test the countDrones(...) functionality.
- Test the findDrone(...) functionality for a normal case.
- Test the findDrone(...) functionality for an error case.
- Test the assignment operator for a normal case.
- test the assignment operator for an error case, e.g. assigning an empty object to an empty object.
- Prove that the removal operation performs in O(log n). For a sample code of time measurement please refer to the sample function in driver.cpp.
- Prove that the insertion performs in O(log n). The following explains a sample algorithm to check the performance.
The insertion time for an AVL tree is log n where n is the number of nodes. Therefore, constructing a tree of n nodes (inserting n nodes) would take n log n time. We can measure the insertion time for constructing two trees with 1000 and 2000 nodes and determine the ratio of change in time while we know that we doubled the number of insertions. For the simplicity we can use the number of ticks instead of actual time.
n = 1000
T1 = n log n				time for constructing a tree of 1000 nodes
T2 = 2n log 2n				time for constructing a tree of 2000 nodes
T2 / T1 = 2n log 2n / n log n		time ratio
T2 / 2T1 = 2n log 2n / 2n log n
T2 / 2T1 = log 2n / log n = log 2000 / log 1000 = 1.1
T2 / 2T1 = 1.1				the ratio we expect theoretically
We consider an absolute error of 0.4 to account for variability in execution environment, etc.
(1.1 – 0.4) < T2 / 2T1 < (1.1 + 0.4)	this ratio is an acceptable ratio
This absolute error value is generally valid when you run your project on the GL server.
The error might be larger on your own computer due to variations in hardware and software
  architecture on your computer.
Random Numbers for Testing
For testing purposes, we need data. Data can be written as fixed values or can be generated randomly. Writing fixed data values might be a tedious work since we need a large amount of data points. The approach for creating data will be your decision.
In the file driver.cpp there is the class Random which generates pseudorandom numbers. The class is using a default seed value. On the same machine it always generates the same sequence of numbers. That is why the numbers are called pseudorandom numbers, they are not real random numbers. Please note, the numbers are machine dependent, therefore, the numbers you see in the sample file driver.txt might be different from the numbers your machine generates.
Memory leaks and errors
- Run your test program in valgrind; check that there are no memory leaks or errors.
Note: If valgrind finds memory errors, compile your code with the -g option to enable debugging support and then re-run valgrind with the -s and --track-origins=yes options. valgrind will show you the lines numbers where the errors are detected and can usually tell you which line is causing the error. - Never ignore warnings. They are a major source of errors in a program.
Implementation Notes
- Implement incrementally based on the dependencies between the functions in a class.
- It'll be much more convenient if you first come up with a development plan.
- Using helper functions is a convenient way to implement recursive functionality.
- The Random class is provided in the sample driver program. This class allows for generating a large amount of random numbers for testing purposes. You can directly copy this class to mytest.cpp.
What to Submit
You must submit the following files to the proj2 directory.
- show.h
- show.cpp
- mytest.cpp - (Note: This file contains the declaration and implementation of your Tester class as well as all your test cases and a main function.)
If you followed the instructions in the Project Submission page to set up your directories, you can submit your code using the following command:
cp show.h show.cpp mytest.cpp ~/cs341proj/proj2/


